Skip to content
  • 0 Votes
    1 Posts
    22 Views
    A
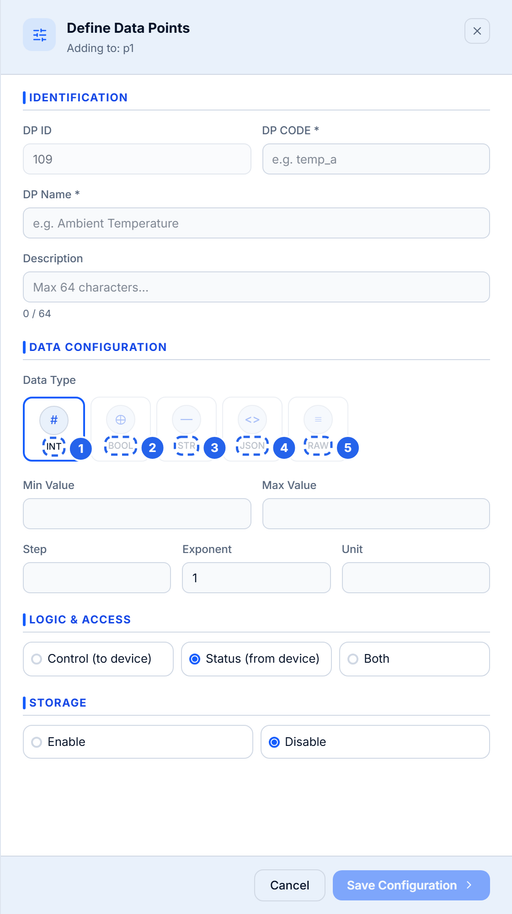
    Data Point Types Explained A data point type is not just a storage detail. It decides what the dashboard can render, what a control widget can write, and how the value is validated. This guide covers the types exposed by the current create panel, plus the two cases people ask about most: decimals and enum values. [image: 1794556169740-01-types.png] The create panel exposes INT, BOOL, STR, JSON and RAW. INT is the numeric type and accepts decimal values. The five top-level types Button Stored as Use it for Notes INT JSON number Temperature, humidity, voltage, counters The numeric type. Decimals are allowed even though the label says INT. BOOL Boolean Pump on/off, door open/closed, relay state Send real true / false, not "on" or 1. STR String Mode names, firmware version, short labels Set a max length. JSON Object with typed fields Schedules, config blobs, grouped telemetry Defined as named fields with their own types. RAW String Opaque vendor frames, hex payloads, pre-encoded data Stored as text; the platform does not interpret it. INT is the numeric type The create panel labels the numeric type INT, but the backend stores it as a number. That means 25.4 is a valid value. There is no separate FLOAT button in this build. If you need fractional values, use INT and set the unit, min, max, and step. When the widget prompts for a number, the step controls the increment. BOOL is strict A boolean data point expects true or false in the payload: { "pump": true } Sending "true", 1, or "on" may be accepted as a string by JSON but will not behave like a boolean in widgets and automations. Normalise the value in firmware before publishing. STR and RAW are not the same Both are stored as strings, but they signal different intent: STR is human-readable: "auto", "eco", "v1.4.2". Use it when the dashboard may display or select the value. RAW is opaque: a hex frame, a base64 blob, a vendor-specific payload. Use it when the platform should store and forward the value without interpreting it. If you want to display the value, prefer STR. If you want to preserve bytes, prefer RAW. JSON data points A JSON point is a small schema. Instead of one value, it contains named fields, each with its own type: [image: 1794556170216-02-json.png] JSON data points are defined as a set of named fields. Each field has its own type and optional default. { "schedule": { "start": "06:00", "duration_min": 15, "enabled": true, "mode": "auto" } } The JSON field editor lets you define each field's key, type, default value, and description. Supported field types are: bool number string enum Use JSON when the values belong together and you want one data point instead of five. Use separate top-level points when each value needs its own widget, history, or automation trigger. [image: 1794556170783-03-json-fields.png] Inside a JSON point you can mix bool, number, string and enum fields. The key is what your device publishes. Enum fields Enum is available as a field type inside JSON and as a binding type in widgets. It maps a stored value to a human label: Key Label auto Automatic eco Eco manual Manual This is the right choice for mode selectors and state machines. A top-level ENUM type is reserved in the schema and supported by some widgets, but the current create panel does not expose it as a top-level button. If you need named states today, use a JSON field with type Enum, or a STR with a documented set of values. Direction is part of the type decision The type says what the value is. The direction says who owns it. [image: 1794556171268-04-direction.png] Direction decides who owns the value: Control means the dashboard writes it, Status means the device reports it. Direction Meaning Typical examples Status (from device) Device reports; dashboard reads Temperature, humidity, battery Control (to device) Dashboard or automation writes; device obeys Pump, target temperature, mode Both Device reports and dashboard can write Setpoint echoed by the device Choose direction before you deploy. A control widget cannot bind to a status-only point, and changing direction later can invalidate existing bindings. Storage and history Storage is separate from type. A point can be live-only or stored: Live-only: the current value is available to monitors and widgets, but no history is kept. Stored: history is written for charts, exports, and audits. High-rate telemetry is often live-only. Daily totals, alarm states, and setpoints are usually stored. Naming rules The identifier is the key your device publishes, so keep it stable and boring. Must start with a letter. Lowercase letters, numbers, and underscores only. Maximum 16 characters. Must be unique within the product. Name: maximum 32 characters. Description: maximum 64 characters. Good: temp, humidity, pump_state, battery_v. Avoid: Temp, pump-state, temperature_sensor_1, t. Choosing a type: quick guide If you are measuring... Use A number, including decimals INT An on/off state BOOL A short label or mode name STR A group of related values JSON An opaque frame or blob RAW A named state inside a group JSON field with type Enum Common mistakes Sending a string for a numeric point. "25.4" is not 25.4. Cast in firmware. Using BOOL for a multi-state value. A pump is boolean; a mode with three values is not. Using five top-level points for one config blob. Use JSON when the values are always updated together. Using JSON when each value needs history. History and widgets are easier with separate points. Renaming a code after devices are deployed. Add a new point instead. Next Quickstart: Device β†’ MQTT β†’ Live Monitor for a working publisher. Your First Dashboard in UI Studio for binding each type to the right widget.
  • 0 Votes
    1 Posts
    34 Views
    A
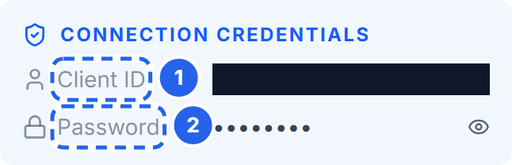
    Quickstart: Device β†’ MQTT β†’ Live Monitor This is the shortest path from a terminal to a live value in GrapesIoT. You need: a product with at least one data point, a device assigned to that product, the device's MQTT credentials, a machine with Node.js 18+ (for the sample publisher). [image: 1794556167890-01-credentials.png] Each device gets a unique client ID (also the MQTT username) and password. Treat the password like a secret. 1. Collect the connection details Open Devices and find the device card. Setting Where to find it Notes Broker URL This guide mqtt://dev.grapesiot.com:1883 Device ID Device route / device record Used in the topic MQTT username Device card β†’ Client ID Usually the same as the device ID MQTT password Device card β†’ Password Secret; do not commit it Topic Built from the device ID 1v0/<DEVICE_ID>/uplink If your deployment uses a different broker, use that host and port. The public broker above is for the hosted test environment; production deployments should use TLS and your own hostname. 2. Understand the envelope Every uplink is a JSON object with four required fields: { "type": 0, "stype": 0, "data": { "temp": 25.4, "humidity": 60, "pump": true }, "dir": 49 } Field Value Meaning type 0 DATA packet stype 0 Device-native sensor reading data object dpcode: value pairs dir 49 Required direction field. For DATA, the server requires it to be present; it does not use it to route the reading. Rules that matter: data keys must exactly match the product's data point codes. data can contain one key or many. Unrecognised keys are ignored, so a typo looks like β€œnothing happened”. The payload must be smaller than 4,100 bytes. Do not use dpid in the payload. Use dpcode. 3. Publish with Node.js Create a scratch folder and install the MQTT client: mkdir grapes-mqtt-test cd grapes-mqtt-test npm init -y npm install mqtt Create publish.mjs: import mqtt from 'mqtt' const BROKER_URL = process.env.MQTT_URL ?? 'mqtt://dev.grapesiot.com:1883' const DEVICE_ID = process.env.DEVICE_ID const MQTT_USERNAME = process.env.MQTT_USERNAME ?? DEVICE_ID const MQTT_PASSWORD = process.env.MQTT_PASSWORD if (!DEVICE_ID || !MQTT_PASSWORD) { console.error('Set DEVICE_ID and MQTT_PASSWORD first.') process.exit(1) } const topic = `1v0/${DEVICE_ID}/uplink` const payload = { type: 0, stype: 0, data: { temp: 25.4, humidity: 60, pump: true, }, dir: 49, } const client = mqtt.connect(BROKER_URL, { username: MQTT_USERNAME, password: MQTT_PASSWORD, clientId: MQTT_USERNAME, clean: true, reconnectPeriod: 0, }) client.on('connect', () => { console.log('connected to', BROKER_URL) client.publish(topic, JSON.stringify(payload), { qos: 1 }, (err) => { if (err) console.error('publish failed:', err) else console.log('published to', topic) client.end() }) }) client.on('error', (err) => { console.error('connection error:', err.message) client.end() }) Run it: $env:DEVICE_ID="<your-device-id>" $env:MQTT_USERNAME="<client-id>" $env:MQTT_PASSWORD="<device-password>" node publish.mjs On macOS or Linux: DEVICE_ID="<your-device-id>" \ MQTT_USERNAME="<client-id>" \ MQTT_PASSWORD="<device-password>" \ node publish.mjs A successful run prints: connected to mqtt://dev.grapesiot.com:1883 published to 1v0/<device-id>/uplink 4. Verify in the monitor Open the device and click Monitor Device. The connection pill should move to Live and any widgets bound to temp, humidity, or pump should update. [image: 1794556168434-02-monitor-live.png] When the payload reaches the broker, the monitor switches to Live and the bound widgets update. If the pill is live but a widget does not change, the message reached the device but the widget is not bound to the data point you published. Check the binding in UI Studio. 5. What the server does with the message Authenticates the MQTT client with the device credentials. Parses the JSON envelope and requires type, stype, data, and dir. Matches each data key to a data point code in the device's product. Updates the device's live state. Writes history if the data point has Storage enabled. Pushes the update to connected monitors over WebSocket. That is why a wrong dpcode can look like a successful publish: the broker accepted it, but the platform had nothing to update. Troubleshooting Symptom Likely cause Fix Connection refused or Not authorized Wrong host/port, client ID, or password Re-copy the credentials; check the broker URL Publish succeeds, monitor stays Not connected Wrong device ID in the topic Use the device UUID, not the product name Monitor is Live, widget does not move Widget not bound, or wrong dpcode Check the Logic tab binding and the payload key Values look like strings Type mismatch Send numbers for INT, booleans for BOOL payload too large Payload over 4,100 bytes Send fewer fields or split the message Security notes Never commit the device password. Use environment variables or a local .env file that is git-ignored. Mask credentials before posting screenshots. Use TLS and a private broker for production. The test broker in this guide is for getting started only. Rotate a device password immediately if it is exposed. Next Data Point Types Explained for choosing the right type and direction. Your First Dashboard in UI Studio for binding the values you just published. Protocol overview: https://embiq.grapesiot.com/protocol
  • 0 Votes
    1 Posts
    24 Views
    A
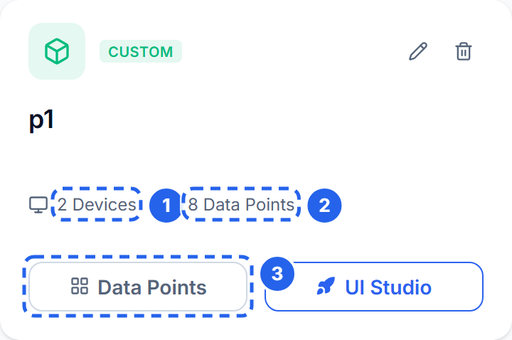
    How GrapesIoT Models Your Fleet Most first-week confusion comes from one question: what is the difference between a product, a data point, and a device? They are three layers of the same contract. Product β†’ what kind of thing am I? Data point β†’ what values does it expose? Device β†’ which physical unit is talking right now? Get those three right and everything else β€” MQTT, dashboards, history, automation β€” follows naturally. [image: 1794556164826-01-products.png] A product is the template. The card summarises how many devices use it and how many data points it defines. Product: the schema, not the hardware A product is a template for a class of device. It is not a physical unit and it does not connect to the broker by itself. A product holds: a name, description, and icon, the list of data points that every device of this type must expose, product-level metadata used by the UI and by templates. Think of it as the firmware interface description. If you are building a greenhouse controller, the product might be Greenhouse Controller v1. Every greenhouse controller you ship uses that same product, so every dashboard, alert, and history query works the same way. Create one product per hardware family. Do not create a product per unit. If two units differ only by serial number, they are devices of the same product. Data point: one named value in the contract A data point is one value the product exposes. It has: Field Purpose Example Name Human label Ambient Temperature Identifier (code) Machine key used in payloads temp Data type How the value is interpreted INT / BOOL / STR / JSON / RAW Direction Who writes the value Status / Control / Both Unit Display suffix Β°C Min / max / step Validation and widget bounds 0 / 60 / 0.1 Storage Whether history is retained on / off Two rules matter more than the rest: The identifier (dpcode) is the key your device publishes. It is not the numeric data point ID. The data type and direction are part of the contract. A dashboard widget that needs a boolean will not bind to a string point, and a control widget will not write to a status-only point. The product detail page lists every data point and shows the code, type, unit, and direction in one table. [image: 1794556165628-02-data-points.png] Data points define what a device can report or accept. The identifier becomes the key you publish in MQTT. Direction: status, control, or both Status (from device): the device reports it. Temperature, humidity, battery voltage, fault code. Control (to device): the dashboard or an automation writes it. Pump on/off, target temperature, mode selector. Both: the value can be reported and written. Use this for things like a setpoint that the device also echoes back. Direction is enforced by the UI and by the binding rules. If a widget cannot see a data point, check the direction before you check the network. Storage: live vs history A data point is live by default. Enable Storage when you need history for charts, exports, or audits. Storage is a per-data-point decision, so you can keep high-rate telemetry live-only and still retain daily totals. Device: one physical unit A device is one unit of a product. It has: a device UUID (used in the MQTT topic), a client ID / MQTT username and password, an optional owner assignment, a live connection state, a monitor view that renders the product's dashboard with real values. When you create a device, assign it to the product. The device then inherits the product's data point schema. If you add a data point later, every device of that product sees it; no per-device schema migration is needed. [image: 1794556166110-03-devices.png] A device is one physical unit. It inherits the product schema and gets its own MQTT client ID and password. Device ID vs client ID They are related but used in different places: The device UUID identifies the device in the topic: 1v0/<DEVICE_ID>/uplink. The client ID shown on the device card is the MQTT username. In the standard provisioning flow it is the same UUID. The password is generated with the device. It is a secret. If your account shows a client ID that differs from the device UUID, use the client ID as the MQTT username and the device UUID in the topic. The monitor is where the model becomes visible: the device's live state is rendered through the product's dashboard, using the bindings defined in UI Studio. [image: 1794556166654-04-monitor.png] The monitor is the runtime view: live values arrive over WebSocket as soon as the device publishes. A worked example Product: Greenhouse Controller v1 Code Name Type Direction Unit Storage temp Ambient Temperature INT Status Β°C on humidity Relative Humidity INT Status % on pump Pump State BOOL Both β€” off mode Operating Mode STR Both β€” off schedule Schedule JSON Both β€” off A device of this product publishes: { "type": 0, "stype": 0, "data": { "temp": 25.4, "humidity": 60, "pump": true }, "dir": 49 } The keys temp, humidity, and pump are the data point codes, not their numeric IDs. The server matches them to the product schema and updates the device's live state. The five mistakes to avoid Putting dpid in the payload. The payload uses dpcode. Numeric IDs are internal. Creating a product per unit. Create a product per hardware family, then add devices. Renaming a dpcode after deployment. It is a breaking change for every device and dashboard. Add a new point and migrate instead. Using a status-only point as a control. The widget will not bind, or the write will be rejected. Storing everything. High-rate telemetry can be live-only. Enable storage only where history is useful. What to read next Quickstart: Device β†’ MQTT β†’ Live Monitor for the exact topic, payload, credentials, and a runnable publisher. Data Point Types Explained for choosing the right type. Your First Dashboard in UI Studio for binding widgets to the data points you just defined.