Skip to content
  • 0 Votes
    1 Posts
    34 Views
    A
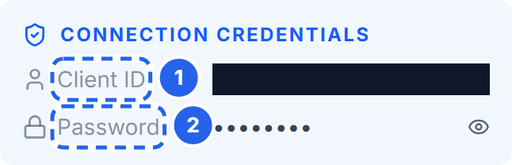
    Quickstart: Device β†’ MQTT β†’ Live Monitor This is the shortest path from a terminal to a live value in GrapesIoT. You need: a product with at least one data point, a device assigned to that product, the device's MQTT credentials, a machine with Node.js 18+ (for the sample publisher). [image: 1794556167890-01-credentials.png] Each device gets a unique client ID (also the MQTT username) and password. Treat the password like a secret. 1. Collect the connection details Open Devices and find the device card. Setting Where to find it Notes Broker URL This guide mqtt://dev.grapesiot.com:1883 Device ID Device route / device record Used in the topic MQTT username Device card β†’ Client ID Usually the same as the device ID MQTT password Device card β†’ Password Secret; do not commit it Topic Built from the device ID 1v0/<DEVICE_ID>/uplink If your deployment uses a different broker, use that host and port. The public broker above is for the hosted test environment; production deployments should use TLS and your own hostname. 2. Understand the envelope Every uplink is a JSON object with four required fields: { "type": 0, "stype": 0, "data": { "temp": 25.4, "humidity": 60, "pump": true }, "dir": 49 } Field Value Meaning type 0 DATA packet stype 0 Device-native sensor reading data object dpcode: value pairs dir 49 Required direction field. For DATA, the server requires it to be present; it does not use it to route the reading. Rules that matter: data keys must exactly match the product's data point codes. data can contain one key or many. Unrecognised keys are ignored, so a typo looks like β€œnothing happened”. The payload must be smaller than 4,100 bytes. Do not use dpid in the payload. Use dpcode. 3. Publish with Node.js Create a scratch folder and install the MQTT client: mkdir grapes-mqtt-test cd grapes-mqtt-test npm init -y npm install mqtt Create publish.mjs: import mqtt from 'mqtt' const BROKER_URL = process.env.MQTT_URL ?? 'mqtt://dev.grapesiot.com:1883' const DEVICE_ID = process.env.DEVICE_ID const MQTT_USERNAME = process.env.MQTT_USERNAME ?? DEVICE_ID const MQTT_PASSWORD = process.env.MQTT_PASSWORD if (!DEVICE_ID || !MQTT_PASSWORD) { console.error('Set DEVICE_ID and MQTT_PASSWORD first.') process.exit(1) } const topic = `1v0/${DEVICE_ID}/uplink` const payload = { type: 0, stype: 0, data: { temp: 25.4, humidity: 60, pump: true, }, dir: 49, } const client = mqtt.connect(BROKER_URL, { username: MQTT_USERNAME, password: MQTT_PASSWORD, clientId: MQTT_USERNAME, clean: true, reconnectPeriod: 0, }) client.on('connect', () => { console.log('connected to', BROKER_URL) client.publish(topic, JSON.stringify(payload), { qos: 1 }, (err) => { if (err) console.error('publish failed:', err) else console.log('published to', topic) client.end() }) }) client.on('error', (err) => { console.error('connection error:', err.message) client.end() }) Run it: $env:DEVICE_ID="<your-device-id>" $env:MQTT_USERNAME="<client-id>" $env:MQTT_PASSWORD="<device-password>" node publish.mjs On macOS or Linux: DEVICE_ID="<your-device-id>" \ MQTT_USERNAME="<client-id>" \ MQTT_PASSWORD="<device-password>" \ node publish.mjs A successful run prints: connected to mqtt://dev.grapesiot.com:1883 published to 1v0/<device-id>/uplink 4. Verify in the monitor Open the device and click Monitor Device. The connection pill should move to Live and any widgets bound to temp, humidity, or pump should update. [image: 1794556168434-02-monitor-live.png] When the payload reaches the broker, the monitor switches to Live and the bound widgets update. If the pill is live but a widget does not change, the message reached the device but the widget is not bound to the data point you published. Check the binding in UI Studio. 5. What the server does with the message Authenticates the MQTT client with the device credentials. Parses the JSON envelope and requires type, stype, data, and dir. Matches each data key to a data point code in the device's product. Updates the device's live state. Writes history if the data point has Storage enabled. Pushes the update to connected monitors over WebSocket. That is why a wrong dpcode can look like a successful publish: the broker accepted it, but the platform had nothing to update. Troubleshooting Symptom Likely cause Fix Connection refused or Not authorized Wrong host/port, client ID, or password Re-copy the credentials; check the broker URL Publish succeeds, monitor stays Not connected Wrong device ID in the topic Use the device UUID, not the product name Monitor is Live, widget does not move Widget not bound, or wrong dpcode Check the Logic tab binding and the payload key Values look like strings Type mismatch Send numbers for INT, booleans for BOOL payload too large Payload over 4,100 bytes Send fewer fields or split the message Security notes Never commit the device password. Use environment variables or a local .env file that is git-ignored. Mask credentials before posting screenshots. Use TLS and a private broker for production. The test broker in this guide is for getting started only. Rotate a device password immediately if it is exposed. Next Data Point Types Explained for choosing the right type and direction. Your First Dashboard in UI Studio for binding the values you just published. Protocol overview: https://embiq.grapesiot.com/protocol
  • πŸ“Ά Connectivity issue? Post like this

    MQTT & Connectivity mqtt wifi tls
    1
    0 Votes
    1 Posts
    118 Views
    A
    Connectivity bugs are config bugs until proven otherwise. Include this every time or expect it as the first reply: broker host + port, security mode (plain / TLS / mutual TLS), client ID, the exact topics you publish and subscribe to (credentials redacted), the client library + version, and the full connection return code or error string. Read the return code before posting Client libraries report why a connection failed β€” quote it exactly: Code / symptom Usual meaning First check Connection refused / failed Wrong host, port, or the broker is down Ping the host; confirm the port (1883 plain, 8883 TLS) is reachable Unauthorized / bad credentials Username, password, or token rejected Regenerate the token; check for expiry and typos Topic rejected ACL blocks that topic for this client Topic must match your device ID exactly, character for character TLS verify failed CA chain not trusted by the device Correct CA cert flashed; device clock synced (unsynced clock = invalid certs) TLS handshake timeout Too little free heap for crypto Need comfortable headroom β€” print free heap before connecting Connects, then drops in seconds Keepalive shorter than your loop, or same client ID connected twice One client ID per device, always; keepalive longer than your longest blocking task The TLS checklist (fixes most "worked on desktop" cases) Sync time first β€” certificates are time-bound. Flash the right CA certificate, and actually verify against it (no insecure-mode leftovers from testing). Mutual auth needs the client cert + key provisioned per device, not copied across the fleet. If WiFi connects but MQTT fails, suspect a blocked port or firewall before suspecting code. Stay connected, not just connected once Reconnect with backoff (don't hammer the broker every 500 ms forever), resubscribe after every reconnect, use LWT so the fleet knows you're gone, and buffer outbound readings locally during outages instead of dropping them. A device that connects once in the lab and never recovers in the field isn't done. Post the return code, your topics, and what the broker logs say. Tag with mqtt, wifi or tls.
  • 0 Votes
    1 Posts
    97 Views
    A
    What is IoT & Connectivity? A device that only blinks an LED is not an IoT device. IoT starts the moment your firmware opens a socket, sends data somewhere, and receives a command back. That sounds simple. In practice it means dealing with unstable WiFi, broker authentication, encrypted connections, dropped packets, industrial sensors that speak 30-year-old protocols, and devices that must keep working even when the internet doesn't. Block 3 is about building firmware that connects to the real world β€” reliably, securely, and in a way that doesn't fall apart the moment something goes wrong in the field. What you'll be able to do after this Read a Wireshark capture of an MQTT session and know exactly what's happening at every step Design a topic schema that works for a single device today and a fleet of thousands tomorrow Write WiFi + MQTT reconnection logic that actually handles every failure case Implement TLS mutual auth and store credentials correctly on the device Get data out of a Modbus RTU sensor and route it to the cloud Build firmware that buffers data locally during outages and syncs when connectivity returns What's covered 3.1 Networking The foundation everything else builds on. Most firmware engineers treat the network stack as a black box and then can't debug it when it misbehaves. This section fixes that β€” TCP/IP mechanics, how WiFi events actually fire on ESP32, and what TLS is doing before your first MQTT packet is sent. β†’ 3.1 Networking sessions 3.2 MQTT Deep Dive MQTT looks simple until you hit production. This goes inside the protocol β€” packet structure, what QoS actually guarantees, topic schema design that scales, retained messages and LWT for device presence, connecting to EMQX and GrapesIoT, and a systematic debugging method for when things break. β†’ 3.2 MQTT sessions 3.3 Communication Patterns Knowing the protocol isn't enough β€” you need to know how to use it well. Pub-sub vs request-response, command-acknowledge patterns, the difference between a telemetry reading and an alarm, and how to buffer data in a ring buffer so a WiFi outage doesn't lose sensor history. β†’ 3.3 Communication Pattern sessions 3.4 Security Real IoT devices have been used to take down the internet (Mirai botnet) and physically destroy industrial equipment. Security here is not theoretical β€” real attack case studies, secure boot, certificate-based auth, correct credential storage in NVS, and signed OTA updates. This is the section that separates hobbyist firmware from production firmware. β†’ 3.4 Security sessions 3.5 Protocols Beyond MQTT MQTT isn't the answer to everything. HTTP/REST for on-device APIs, WebSocket for local dashboards, Modbus RTU for industrial sensors on RS-485 (which isn't going away), and BLE provisioning so users can configure WiFi credentials without hardcoding them. β†’ 3.5 Protocols sessions Capstone A fully connected, secure IoT device β€” TLS-authenticated MQTT connection to GrapesIoT, proper topic schema, LWT-based presence detection, and offline buffering that survives a broker outage. Submitted to the lab forum and reviewed against a checklist. β†’ Block 3 Labs β€” submit here Start at embiq.grapesiot.com/embedded-iot/block3 β€” each section links to its sessions from there. Post questions in this category and tag with the section number (e.g. 3.2) so the right people see it.