Quickstart: Device → MQTT → Live Monitor
This is the shortest path from a terminal to a live value in GrapesIoT.
You need:
a product with at least one data point,
a device assigned to that product,
the device's MQTT credentials,
a machine with Node.js 18+ (for the sample publisher).
[image: 1794556167890-01-credentials.png]
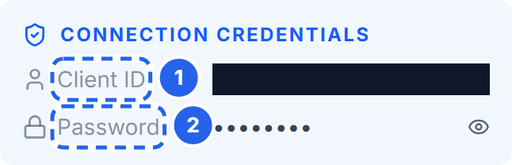
Each device gets a unique client ID (also the MQTT username) and password. Treat the password like a secret.
1. Collect the connection details
Open Devices and find the device card.
Setting
Where to find it
Notes
Broker URL
This guide
mqtt://dev.grapesiot.com:1883
Device ID
Device route / device record
Used in the topic
MQTT username
Device card → Client ID
Usually the same as the device ID
MQTT password
Device card → Password
Secret; do not commit it
Topic
Built from the device ID
1v0/<DEVICE_ID>/uplink
If your deployment uses a different broker, use that host and port. The public broker above is for the hosted test environment; production deployments should use TLS and your own hostname.
2. Understand the envelope
Every uplink is a JSON object with four required fields:
{
"type": 0,
"stype": 0,
"data": {
"temp": 25.4,
"humidity": 60,
"pump": true
},
"dir": 49
}
Field
Value
Meaning
type
0
DATA packet
stype
0
Device-native sensor reading
data
object
dpcode: value pairs
dir
49
Required direction field. For DATA, the server requires it to be present; it does not use it to route the reading.
Rules that matter:
data keys must exactly match the product's data point codes.
data can contain one key or many. Unrecognised keys are ignored, so a typo looks like “nothing happened”.
The payload must be smaller than 4,100 bytes.
Do not use dpid in the payload. Use dpcode.
3. Publish with Node.js
Create a scratch folder and install the MQTT client:
mkdir grapes-mqtt-test
cd grapes-mqtt-test
npm init -y
npm install mqtt
Create publish.mjs:
import mqtt from 'mqtt'
const BROKER_URL = process.env.MQTT_URL ?? 'mqtt://dev.grapesiot.com:1883'
const DEVICE_ID = process.env.DEVICE_ID
const MQTT_USERNAME = process.env.MQTT_USERNAME ?? DEVICE_ID
const MQTT_PASSWORD = process.env.MQTT_PASSWORD
if (!DEVICE_ID || !MQTT_PASSWORD) {
console.error('Set DEVICE_ID and MQTT_PASSWORD first.')
process.exit(1)
}
const topic = `1v0/${DEVICE_ID}/uplink`
const payload = {
type: 0,
stype: 0,
data: {
temp: 25.4,
humidity: 60,
pump: true,
},
dir: 49,
}
const client = mqtt.connect(BROKER_URL, {
username: MQTT_USERNAME,
password: MQTT_PASSWORD,
clientId: MQTT_USERNAME,
clean: true,
reconnectPeriod: 0,
})
client.on('connect', () => {
console.log('connected to', BROKER_URL)
client.publish(topic, JSON.stringify(payload), { qos: 1 }, (err) => {
if (err) console.error('publish failed:', err)
else console.log('published to', topic)
client.end()
})
})
client.on('error', (err) => {
console.error('connection error:', err.message)
client.end()
})
Run it:
$env:DEVICE_ID="<your-device-id>"
$env:MQTT_USERNAME="<client-id>"
$env:MQTT_PASSWORD="<device-password>"
node publish.mjs
On macOS or Linux:
DEVICE_ID="<your-device-id>" \
MQTT_USERNAME="<client-id>" \
MQTT_PASSWORD="<device-password>" \
node publish.mjs
A successful run prints:
connected to mqtt://dev.grapesiot.com:1883
published to 1v0/<device-id>/uplink
4. Verify in the monitor
Open the device and click Monitor Device. The connection pill should move to Live and any widgets bound to temp, humidity, or pump should update.
[image: 1794556168434-02-monitor-live.png]
When the payload reaches the broker, the monitor switches to Live and the bound widgets update.
If the pill is live but a widget does not change, the message reached the device but the widget is not bound to the data point you published. Check the binding in UI Studio.
5. What the server does with the message
Authenticates the MQTT client with the device credentials.
Parses the JSON envelope and requires type, stype, data, and dir.
Matches each data key to a data point code in the device's product.
Updates the device's live state.
Writes history if the data point has Storage enabled.
Pushes the update to connected monitors over WebSocket.
That is why a wrong dpcode can look like a successful publish: the broker accepted it, but the platform had nothing to update.
Troubleshooting
Symptom
Likely cause
Fix
Connection refused or Not authorized
Wrong host/port, client ID, or password
Re-copy the credentials; check the broker URL
Publish succeeds, monitor stays Not connected
Wrong device ID in the topic
Use the device UUID, not the product name
Monitor is Live, widget does not move
Widget not bound, or wrong dpcode
Check the Logic tab binding and the payload key
Values look like strings
Type mismatch
Send numbers for INT, booleans for BOOL
payload too large
Payload over 4,100 bytes
Send fewer fields or split the message
Security notes
Never commit the device password. Use environment variables or a local .env file that is git-ignored.
Mask credentials before posting screenshots.
Use TLS and a private broker for production. The test broker in this guide is for getting started only.
Rotate a device password immediately if it is exposed.
Next
Data Point Types Explained for choosing the right type and direction.
Your First Dashboard in UI Studio for binding the values you just published.
Protocol overview: https://embiq.grapesiot.com/protocol
 2
0 Votes1 Posts34 Views